
Testing Your Web Site Before Changing DNS
Before changing the DNS to point to the new server during a site migration, you should test your website. You can force your computer to visit the new server when you visit your domain name by using the hosts file on your computer.
What is a Hosts File?
A local repository for resolving a domain name to an IP address is the hosts file on your computer. This approach existed before contemporary DNS systems. Prior to submitting any DNS requests to resolve a domain, your computer will examine the hosts file. This enables you to modify your hosts file so that when your computer visits a domain name, it is forced to visit a different IP address.
Example
Below is an example from a Windows hosts file that shows google.com and www.google.com pointing to a different IP address than what is reported by a DNS lookup.
# Copyright (c) 1993-2009 Microsoft Corp.
#
# This is a sample HOSTS file used by Microsoft TCP/IP for Windows.
#
# This file contains the mappings of IP addresses to host names. Each
# entry should be kept on an individual line. The IP address should
# be placed in the first column followed by the corresponding host name.
# The IP address and the host name should be separated by at least one
# space.
#
# Additionally, comments (such as these) may be inserted on individual
# lines or following the machine name denoted by a '#' symbol.
#
# For example:
#
#      102.54.94.97     rhino.acme.com          # source server
#       38.25.63.10     x.acme.com              # x client host

# localhost name resolution is handled within DNS itself.
#	127.0.0.1       localhost
#	::1             localhost
142.250.201.142 google.com
142.250.201.142 www.google.com
How to Edit the Hosts File
Windows PC (Windows 95, 98, Me, NT, 2000, XP, 2003, Vista, 7, 8, 10, 11)
1. Open Notepad as Administrator.
Click the start menu, in the run box type “notepad.exe”.
You should see an icon for the Notepad application, right click on this icon and click Run as Administrator.
You will likely receive a warning message asking if you are sure you would like to proceed. Click on Yes.
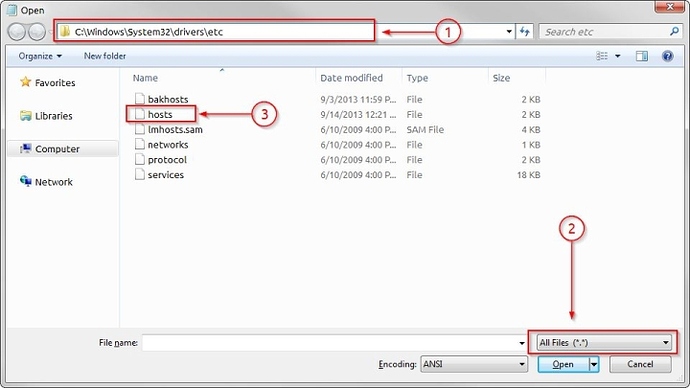
2. In Notepad click File–>Open.
3. You will then navigate to the following directory:
Windows NT, 2000, XP, 2003, Vista, 7, 8, 10, 11:
C:\windows\system32\drivers\etc\hosts
Windows 95, 98, Me:
C:\windows\hosts
Please note that the file type drop-down menu needs to be changed to “All Files” to see the hosts file.
4. On the last line add your entry as shown below then save and close Notepad. This example assumes we want to point domainname.com to 0.0.0.0.
If you receive an error when saving the file, you may need to temporarily disable any Anti-Virus running while you make this change. Normally you don’t want this file to be editable.
You will replace the 0.0.0.0 with the IP Address of your site in our system. The IP Address that you need to use can be found in your cPanel.
0.0.0.0 domainname.com
Mac OS
1. Open a finder window and navigate to your Applications folder.
2. Open the Utilities folder.
3. Locate the Terminal app and double-click it.
4. When the terminal opens, enter this command:Mac OS 10.6 and higher:sudo nano /etc/hostsMac OS 10.5 and below:sudo nano /private/etc/hosts
5. Enter your Mac user’s password when prompted.
6. On the last line add your entry as shown below. This example assumes we want to point domainname.com to 0.0.0.0.
Replace 0.0.0.0 with the IP Address of your new hosting account.
0.0.0.0 domainname.com
7. Press control + X, then press y when prompted to save your changes.
Linux
1. SSH into your console or open your terminal if you run a GUI on your Linux machine.
2. Enter the following command:sudo nano /etc/hosts
3. Enter your root password when prompted.
4. On the last line add your entry as shown below. This example assumes we want to point domainname.com to 0.0.0.0.
Replace 0.0.0.0 with the IP address provided in your new account information email.0.0.0.0 domainname.com
5. Press ctrl-x, and then press y when prompted to save your changes.
Note: If you plan to test with the www version of your domain name, you must add an entry for the www version of your domain to the hosts file. You may also need to flush your computer’s DNS resolver cache after making these changes as well.
Did this answer your question?
Thanks, your feedback has been sent.